Pages

Friday, 10 October 2014

Get back Deleted Whatsapp Messages -How to Guide

We All are Aware of Messaging app Called Whatsapp, We Use it daily and no doubt We Love it, But have you been in a Situation when you accidently delete an important message on Whatsapp and you don’t know what to do next? Well Touch screen devices are great to use but many a times it frustrates you,when you tap on wrong option and things happens which you don’t wished to do.

Many of you might not know that there are ways to Get back Deleted Whatsapp Messages. Today in this article i will share two Methods to Get back Deleted Whatsapp Messages on your Android phone.

1) Manually
2) Using Web Application

Get back Deleted Whatsapp Messages-Manually


Only Few Knows that Whatsapp Creates backup of all the data each day at 4 am (system time) Which is Stored in the SD card of your Android Smartphone. Follow the below simple steps and i will show you to Get back Deleted Whatsapp Messages.

Step 1) First of all Navigate to the Whatsapp database folder, you will require file explorer for this task. the path is > sdcard/WhatsApp/Databases.
 
Step 2) In the Database folder you will see Chat files which are with names similar like msgstore-2014-01-04.1.db.crypt. You may notices the file names have dates as well. but there is a File which is msgstore.db.crypt, we need to rename it. you can add any word before msgstore.db.crypt.

Step 3) After renaming that file, From the other Files just select the file which shows appropriate date before you accidently deleted your whatsapp messages, and then rename that file to msgstore.db.crypt. This Renaming process can also be done on your PC by Connecting your device.

Step 4) Now the Final step, Goto Setting>Applications>manage applications>Whatsapp and Click on Clear Data. Now open Whatsapp, Choose Restore when it prompts. Thats it, the chat file saved as msgstore.db.crypt will be restored and hence your messages too.

Get back deleted whatsapp messages 

On Reaching here, you Need to Click on Restore instead of No Thanks.
Bonus: In Case if you have deleted any Image or Audio or Video from your whatsapp chat, then do not worry, its not deleted forever untill you delete it. To view that image or Video all you have to do is with the help of your Preferred file Manager, Navigate to sdcard/WhatsApp/Media Where you will find folders with names Whatsapp Audio, Whatsapp images, Whatsapp video, Open them up to find the file you are looking for.

Get back Deleted Whatsapp Messages- Using Web App


In this Method we are Going to use a Web Application Called Recover Messages which is Specially Designed to Get back Deleted Whatsapp Messages. This is a Free Online Services which will help you to Read the Content of the database file and shows you Sent and Recieved messages.

Simply Go to Recover messages Site, Click on Select SQlite file to Upload the Database file, Select the Database file from SD card , Check the box which says i accept the terms of use and click on Scan.

Get back deleted whatsapp messages

Just wait for few seconds while it takes a bit of time to show you the Messages. With this Simple Method you can View your deleted Whatsapp messags within less than a minute.

The only drawback is You can only extract and View/Read your deleted messages but you can not restore them to your whatsapp chat history.

So in this article we saw two methods to Get back Deleted Whatsapp Messages, i hope it helps you now or in future. Don’t forget to share it on Social media if you liked it and You may subscibe for the free Daily Updates directly to your e-mail inbox, Using Below Subscription box.

Trick to Access a Windows Desktop from Your SmartPhone or Tablet

Yes,you can Access a Windows Desktop from Your SmartPhone or Tablet. IPads and android tablets or Smartphone can’t run windows app locally, but with this you can remote your windows desktop, even with a physical keyboard. Many apps has been developed and launched like Microsoft remote desktop app, TeamViewer for Remote Control, among which Microsoft app is mostly used for professional use while the other app can also be used for personal uses.


Microsoft’s remote desktop app 


This app has reduced the work load from one’s head of staying in the home and working all the day and cancelling the vacations and many more just because of the work info is available in your PC. With Microsoft remote desktop app, you can connect to your work resources and remote PC from anywhere you feel like working. This app is mostly used for business and professional use rather than the personal use.
Features of this app :
  • Access your desktop with your phones easily.
  • Rich multi-touch experience with remote desktop protocol (RDP).
  • It has an outstanding feature or technology, namely Network Layer Authentication which secure connection to your data and applications.
  • High quality video and sound streaming.
Review for this app :This app is friendly for the business related persons or for the professional use but not so friendly for the personal use.

TeamViewer for Remote Control


This app is friendly for the personal use too no matter wherever you are, rather than controlling your own computer you can also remotely troubleshoot your relatives PC.
Features : 
  • Access to computers (windows, Mac, Linux) is possible also during a telephone call.
  • Transfer the files from your PC to phone or from phone to PC.
  • Automatic quality adjustment.
  • Remotely reboot the computer.
  • TeamViewer free is for private use only e.g. to access or solve your or your friends computer problems.
All you have to do is Download an Install Teamviever on Your Desktop and Mobile, after installing on your smartphone you will have to login with the details that teamviewer window displays.

Other Options: Other than these two apps you surely have other options too if you are not friendly with both of them.

Splashtop: This is another popular remote desktop app that people reportedly has said that it is faster. But unfortunately this is not a free app as it may cost you around $20 at regular price. And to use it over internet you need to buy an additional “Anywhere access pack”. This app can be used or purchased if you don’t mind spending money or if you need a faster app to complete your work fast.

Conclusion: With the development of these apps both personal and professional works are carried out easily and in a better manner with easy access.

Disable Automatic Restart after Windows Update

If you are a Microsoft Windows User than you must have experienced that Windows ask you to Restart your PC after a Windows Update or after installing any Software for the Changes to Take effect. Chances are you don’t Have any other option other then Rebooting your PC at that time leaving your Work undone and incomplete.

Rebooting your PC is Important after Windows update so that All the Changes actually take Effects. But what if you are Working on your Computer and Windows Decides to show you a Pop-up which says You need to Reboot your PC or Your PC will Reboot in so and so Seconds make sure to Close all Running Programs. This Irritates, So Today in this article i will be discussing Two Methods to

Disable Automatic Restart after Windows Update or after installing any Softwares.

Registry Hack to Disable Automatic Restart


In this Method We will be performing Registry hack to Disable Automatic Restart, This Method works in all versions of Windows 8/7/vista and Xp. Follow the below simple Steps Carefully.

Step 1: Open Registry editor, to do so Press Windows + R key to open Run Dialog, Then type in regedit and click on OK. Windows may ask you for Permission so click on Yes to allow.
 
Step 2: Now Navigate to HKEY_LOCAL_MACHINE\SOFTWARE\Policies\Microsoft\Windows , Here will will have to Create two new Keys, Right Click on Windows key in registry editor, Hover on New and Click on Key. Refer to the below pic for better idea.

Disable Automatic Restart


Step 3: We will Name the New Key as WindowsUpdate, We have Created 1 Key now Right Click on the Recently Created Key ie WindowsUpdate hover on New and Click on Key, We will Name this Key as AU.

Step 4: Make Sure AU key is selected, Right Click no the Right Pane , hover on New and this time Select DWORD (32-bit). Name it as NoAutoRebootWithLoggedOnUsers.

Disable Automatic Restart

Step 5: Now the last step is to add a Value to it, So Double Click on NoAutoRebootWithLoggedOnUsers and Type 1 In Value Data Box and Press ok. Thats all we are done and have Disable Automatic Restart.

Disable Automatic Restart

Now you may Reboot your PC for the Changes to take place. or there is a way to make this changes to take place without Rebooting. Check this out. Open Command Prompt and make sure you run it as
Administrator. Now Enter this Command “gpupdate /force” to make the changes to take effect immediately without rebooting it.

Disable Automatic Restart Using Group Policy


Group Policy Editor Method is more User Friendly, If you find the Registry hack method a bit Confusing or Hectic , Feel Free to try this Method. Both the Methods Work in the same way. On the other hand,Some Windows User may not have this Group Policy Option so they may go for the Registry hack Method.

Step 1:  Open Local Group Policy Editor by Pressing Windows + R key to open Run Dialog, and type in gpedit.msc.


Step 2: Now navigate to Computer Configuration\Administrator Templates\Windows Components\Windows Update in the Left Panel . Now in the Right , Find and Double Click on “No auto-restart with logged on users for scheduled automatic update installations”  .

Step 3: A new Window will pop-up, in that choose Enable and Click on OK. thats it done with this method, Now you may restart your PC or Use above Mentioned Command for the Changes to take effect without Restarting your PC.

So Using any of the above 2 Methods you Will not asked to Reboot your Pc by Windows. Obviously you need to reboot your PC after windows update but that will be done when you wish to.

Create Separate partition for windows-How to Guide

If you are a regular computer user , you must have faced the problem of securing your personal data when you need to upgrade or re-install window due to some reasons. Most of the times , we reinstall the windows because it is totally corrupt or has slowed down upto non tolerable extent.

Sometimes we get to save our data by shifting it to some secondary storage devices as backup like Portable Hard disk , Skydrive or some other storage medium but most of the time we loose our important data because of this problem.

So here I am going to tell you a simple method for saving your important data easily while you upgrade or re-install windows.

You can simply Create Separate partition for your operating system at the time of installation. It can be done by following some simple steps as given below :

How to Create Separate partition


Step 1 :

When installing windows –

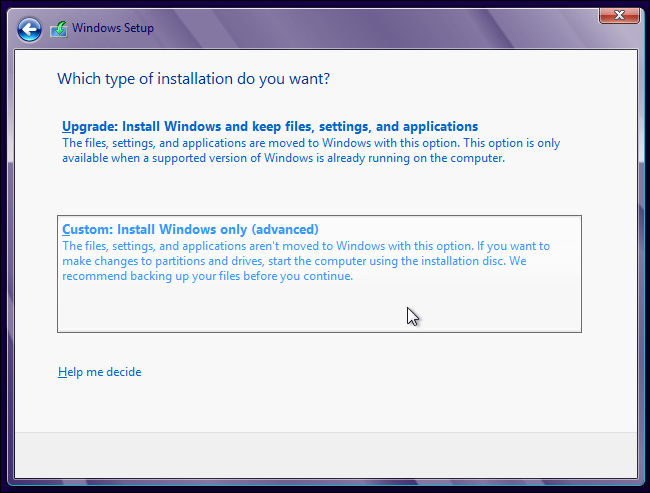
To Create Separate partition while installing Windows 7 or Windows 8, you’ll need to select the Custom installation option during the initial stage of your windows installation setup. Go through the installation process normally until you reach the “Which type of installation do you want?” screen and then click the Custom option from given choices. For better understanding given a screenshot below


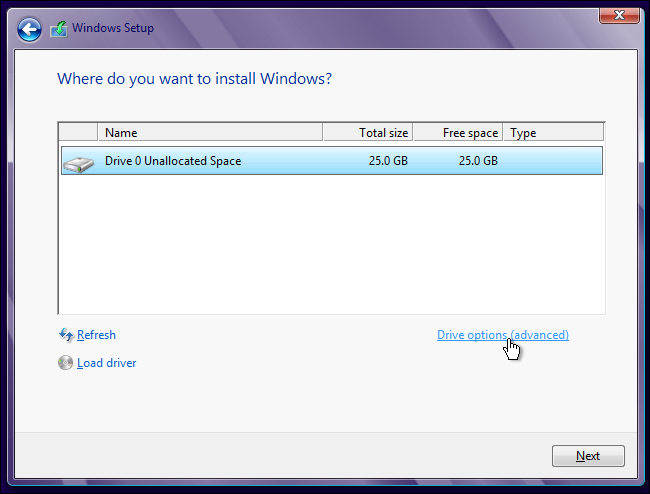
Once you start setup with the Custom installation of windows , you will be moved forward to a new screen with some more options as shown in image shown below :


Now here in this window , you simply have to click on Drive options (Advanced) option present at right side of dialog box.

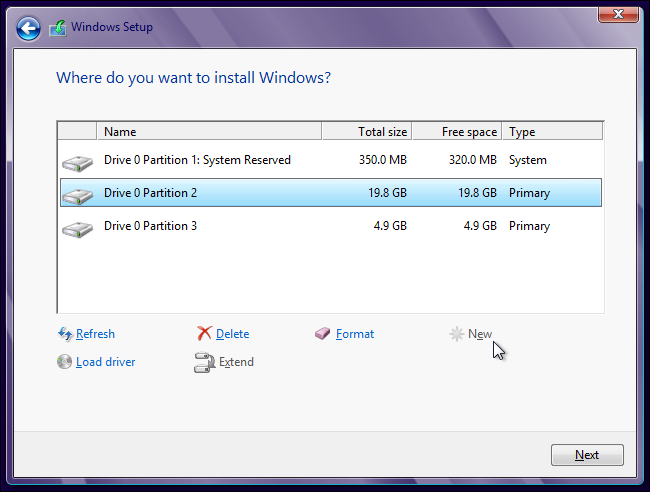
Create several partitions by clicking the New button and entering desired size for each partition.

When you’re done with your partition sizes, select the partition where you wish to install windows and click the Next button. Windows will start installing to that partition. The space on the other partition will be available as its own separate drive letter in Windows.


Now upto this step , you are all done with setting up your system for installing window in a separate partition.

Once the window is completely installed in your selected partition or drive , all you have to do is make sure that whenever you install any application or software on your system , never keep it in same drive where you have installed windows. Always keep your personal files and data in some other drive than windows primary drive so that whenever you need to upgrade or re install windows , our data stay in safe place .

When you install software most of them has their default path in C:/Program files but this is not a compulsion to install them in C: drive, you can install them in any drive where you wish to install them. So try to make it some other drive than C: because they are more safe from any accidental damage to data.
By following above procedure once , you will be free to reinstall your windows anytime you want without worrying about your data .

Remove write protection in Pendrive and Memory Card

Don’t you just hate it when you buy a Pendrive or a Memory card and there’s nothing you can do to it? Whether it comes with software on it, or you’re just trying to use it for any other purpose, you should have the right to change things up however you like.

In this guide, you will be shown how to Remove Remove write protection in Pendrive and Memory Card. It’s a fairly simple process, so be sure to follow each and every step carefully. This guide is for information purposes and we are not responsible for anything that may happen to your device in the process.

Remove write protection in Pendrive

Before we proceed, what is Write protection exactly? Write Protection is when the manufacturer locks the device down from being written on and prevents unauthorized access to add, change or delete the files on the device. While the uses of write protection is a good thing because it prevent files from being tampered with and the manufacturer can make sure all users are getting the same files, but it’s also very inconvenient. To remove this protection, to you will need to format the drive.

In this guide, I will show you exactly how to do that. Follow each and every step carefully, please. Windows platform is used for the purpose of this guide.

How to Remove Remove write protection in Pendrive ?


Step 1: Plug in your pendrive into your USB 2.0 on your computer. In order to make sure the computer has read your pendrive, you can go down to your bottom left on Windows, you will notice a small USB drive icon. If you click that, it will say “Removable Disk.” This means that the pendrive has been read successfully.  You can take a backup of your files from the pendrive or Memory card, Because we here are going to format it Completely.

Step 2: Next we need to open up command prompt. You can do this by simply going to “Start”, then just search for “Command Prompt”, or you can simply just type in “cmd” and command prompt should pop up.

Step 3: In the command prompt, type in the drive letter of your pen drive with a colon at the end, like this: “ F: ” but without the quotation marks.

Step 4: After putting in the previous command, type in “format” without the quotation marks. Here’s how to do it: “format F:” and then press “Enter.”
This should get the process started to Remove write protection in Pendrive. Make sure that you are entering the right command with the right drive letter. If you have more than one pen drive plugged in, make sure that you do select the right one as you can accidentally format the wrong drive, causing loss of data.

Step 5: After the process is complete, proceed to closing command prompt.
Congratulations! You’re successfully removed the Remove write protection in Pendrive.
If you have any questions or concerns, please write them in the comments section below. Let us know how we did and how things went for you.

Use Keyboard as Mouse – How to Guide

Recently My Mouse Stopped Working because of Drivers got Currupted, Device Drivers Getting Currupted in Windows May not be the Common Problem, But Can happen anytime with you, Due to this Problem i was not able to use my mouse. I Tried every possible Solution like uninstalling drivers and restarting my PC. Unplugging and then pluging in my mouse back, and yeah Searched internet too, Since i was not able to use my mouse, i had to Use Keyboard as Mouse While Finding for solution to this Problem.

Guess What ? Nothing Helped and Had to Refresh my Windows 8, But Hey, Everything happens for good. Thankfully I knew how to Use Keyboard as Mouse flawlessly. Well this was just my Reason, at times there are situations where you may need to Substitute your mouse with Keyboard. So today in this tutorial we will Learn to Use Keyboard as Mouse In Windows.

How to Use Keyboard as Mouse in Windows


Windows OS has an Inbuilt option Called MouseKeys, Not much people are aware of it but yes now you are.  You can Enable/disable and disable MouseKeys very Easily.
  • You can Enable it by Pressing  Alt + Shift + Numlock keys. As soon as you do it, you will be prompt with the below dialog box, Just Click Yes to it.
  •  
Use keyboard as mouse
  • Make Sure your Numlock is Off while you Use keyboard as mouse.
  • Done !!! Now you will see MouseKeys icon on your taskbar, which means now you are all set.
  • Now talking about the Controllers,  Use 8,2,4 and 6 Keys from Numpad to move Up, Down, Left and Right Respectively.
Alternatively You can also use Third Party Program Called NeatMouse , This software is portable, Main advantage to use it is it gives you better Control because of additional options that it makes available. it have an option to Remap Controller keys according to your Comfort.

Probably we will have to Use Keyboard as Mouse temporarily and not for long time so one may not prefer to get third party software for this task, but many may do it as it is free and can be helpful.

Resize Image without loosing Quality – How to Guide

People hate to visit websites which require more time for loading. So one should always seek to improve the webpage load time, so to do so you have to look at many things like loading sources, page cache, media files etc. One among such media file is images, adding beauty to your page, but at the same time, it is regarded as the most bulky resources which takes much time to load on the page, thereby causing inconvenience to the visitors.

But one can improve the page load time by cutting the size of an image to a significant amount. But even resizing the image without any proper knowledge may be troublesome as you may lose the quality it had. Though photoshop provides a nice feature to save the original quality of the pic, it is not preferred much as it’s too expensive to purchase the photoshop application for desktop or web version. So here I’m going to provide you with free online tools to Resize Image without loosing Quality

Web Based Tools to Resize Image without loosing Quality


1.Kraken.io :

JPEG, PNG, GIF, SIV are some of the image formats that can be compressed with this online application. This reduces the image to a quite considerable point without losing the image size.
This application is also available in Chrome and Firefox extensions

2.Imageoptimizer.net:

After uploading the image from your computer, give the size of the image and quality you wish to have after processing. This provides only some control of the output and compression ratio But Greatly Helps to Resize Image without loosing Quality.

3.Smush.it:

Smush.it is the best and popular online application you can have to compress images. It is present with an up-loader as well as URL box to have the image. In this you will not be provided with the ‘enter’ option to enter the image quality as that of previous one because it automatically optimizes the image by compressing it to a limit.

4.Compressjpg.com & Compresspng.com :

I would suggest you to have these application, for more control of the image quality. A slider appears as soon as you upload an image to auto control the quality of the last image. A preview panel is provided for showcasing the changes according to the quality slider change. So before downloading the image you can have the review of your final image. This application is available on different domains for JPG and PNG images.

5.Punypng.com :

This application is available to compress the PNG files. Upload an image and you can get a compressed size of the image. Besides this, tinypng.com , a quick tool to compress the PNG images to the best level without affecting the image quality.

Desktop tool to Resize Image without loosing Quality


If you need a Desktop tool to do this task then i would suggest you to have PNG Gauntlet as your first choice, You will need .Microsoft Net Framework 4.0 to run this tool on your Windows.

Resize Image without loosing Quality

You won’t Face any difficulty in Using this tool as it is very User Friendly. While Optimizing the images PNG Gauntlet will show you older size and Optimized size of the image. this Program is not that Fastest at it work but Usefull.